X(Twitter)のAPIを使って自動投稿・取得する方法を説明します。
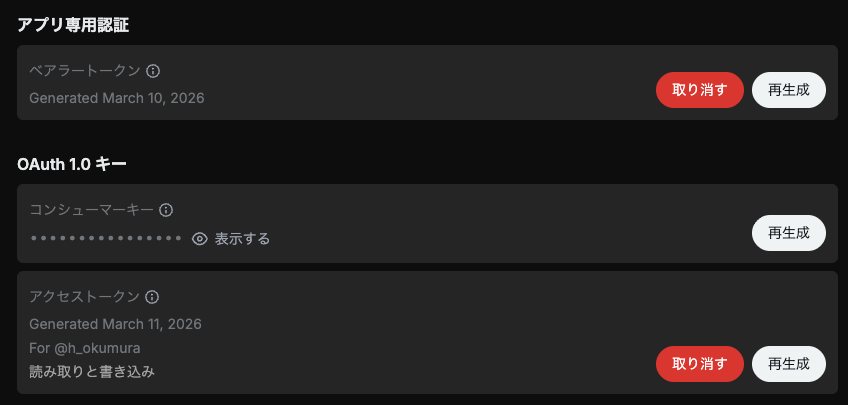
2026年2月ごろから、無料ではできなくなりました。詳しくはDeveloperのページを参照してください。支払いの設定ができたら、コンソールから新たにPay Per Useのアプリを作ります。2026-04-20以降の料金は、1回の投稿に0.015ドル(URL付きは0.20ドル!)のようです(取得0.005ドルは今まで通り? GET /2/users/{id}/tweets を使えば0.001ドル?)。とりあえずOAuth 1.0キーが必要です。
公式のパッケージ xdk が公開されており、コード例が X API v2 - Python Examples にいろいろ載っていますが、以下では汎用のパッケージを使う方法を示しました。あらかじめ pip install requests requests-oauthlib しておきます。
import requests
from requests_oauthlib import OAuth1

API_KEY = "..."             # OAuth 1.0 コンシューマーキー
API_SECRET = "..."          # OAuth 1.0 シークレット
ACCESS_TOKEN = "..."        # OAuth 1.0 アクセストークン
ACCESS_TOKEN_SECRET = "..." # OAuth 1.0 アクセストークンシークレット

auth = OAuth1(API_KEY, API_SECRET, ACCESS_TOKEN, ACCESS_TOKEN_SECRET)

text = "こんにちは!"

r = requests.post(
    "https://api.x.com/2/tweets",
    auth=auth,
    json={"text": text},
    timeout=30,
)
print(r.status_code, r.text)
r.raise_for_status()
tweet_id = r.json()["data"]["id"]
print("Posted:", tweet_id)
読む方は Get Post by ID または Get Posts by IDs に書いてありますが、Bearer token を使う方法(OAuth 2.0 App-only)、API key/secret + access token/secret を使う方法(OAuth 1.0a)があります(ほかにもありますが省略)。前者はログインなしで読む方法、後者はログインして読む方法に対応します。まず前者(params については後述):
import json
import requests

BEARER_TOKEN = "..."

TWEET_ID = 2031524952067977685

url = f"https://api.x.com/2/tweets/{TWEET_ID}"

r = requests.get(
    url,
    headers={"Authorization": f"Bearer {BEARER_TOKEN}"},
    # params=params,
    timeout=30
)

print("Status:", r.status_code)
r.raise_for_status()
payload = r.json()
print(json.dumps(payload, indent=2, ensure_ascii=False))
後者:
import json
import requests
from requests_oauthlib import OAuth1

API_KEY = "..."
API_SECRET = "..."
ACCESS_TOKEN = "..."
ACCESS_TOKEN_SECRET = "..."

TWEET_ID = 2031524952067977685

url = f"https://api.x.com/2/tweets/{TWEET_ID}"
auth = OAuth1(API_KEY, API_SECRET, ACCESS_TOKEN, ACCESS_TOKEN_SECRET)

r = requests.get(
    url,
    auth=auth,
    # params=params,
    timeout=30,
)

print("Status:", r.status_code)
r.raise_for_status()
payload = r.json()
print(json.dumps(payload, indent=2, ensure_ascii=False))
パラメータをいろいろ指定できます。# params=params の頭の # を取って、パラメータをあらかじめ次のような感じで指定します。不要な項目は # で消してください。
params = {
    "tweet.fields": ",".join([
        "article",
        "attachments",
        "author_id",
        "card_uri",
        "community_id",
        "context_annotations",
        "conversation_id",
        "created_at",
        "display_text_range",
        "edit_controls",
        "edit_history_tweet_ids", # default
        "entities",
        "geo",
        "id",  # default
        "in_reply_to_user_id",
        "lang",
        "media_metadata",
        # "non_public_metrics",  # 指定するとエラーになることが多い
        "note_tweet",  # long-form post
        # "organic_metrics",  # 指定するとエラーになることが多い
        "possibly_sensitive",
        # "promoted_metrics",  # 指定するとエラーになることが多い
        "public_metrics",
        "referenced_tweets",
        "reply_settings",
        "scopes",
        "source",
        "suggested_source_links",
        "suggested_source_links_with_counts",
        "text",  # default
        "withheld"
    ]),
    "expansions": ",".join([
        "author_id",
        "referenced_tweets.id",
        "edit_history_tweet_ids",
        "in_reply_to_user_id",
        "attachments.media_keys",
        "attachments.poll_ids",
        "geo.place_id",
        "entities.mentions.username",
        "referenced_tweets.id.author_id",
    ]),
    "user.fields": ",".join([
        "id", "name", "username",  # defaults
        # "affiliation", "confirmed_email",
        # "connection_status", "created_at", "description", "entities",
        # "is_identity_verified", "location", "most_recent_tweet_id",
        # "parody", "pinned_tweet_id", "profile_banner_url",
        # "profile_image_url", "protected", "public_metrics",
        # "receives_your_dm", "subscription", "subscription_type",
        # "url", "verified", "verified_followers_count",
        # "verified_type", "withheld",
    ]),
    "media.fields": ",".join([
        "media_key", "type",  # defaults
        # "url", "duration_ms", "height",
        # "preview_image_url", "public_metrics",
        # "width", "alt_text", "variants"
    ]),
    "poll.fields": ",".join([
        "id", "options",  # defaults
        "duration_minutes", "end_datetime", "voting_status",
    ]),
    "place.fields": ",".join([
        "full_name", "id",  # defaults
        "contained_within",
        "country", "country_code", "geo", "name", "place_type",
    ]),
}
パラメータを指定しても取得できないものもあり、よくわかりません。