iPhoneの「ヘルスケア」アプリを開き,右上の自分のアイコンをタップし,「すべてのヘルスケアデータを書き出す」をタップする。共有方法としては,最近はAirDropでMacに送っている。
以前にこのページで紹介していたのは「"ファイル"に保存」でiCloud Driveに保存する方法であった。iPhoneがWi-Fiでインターネットに接続していなければ同期しないかもしれないので注意。MacのFinderでiCloud Driveにアクセスし,「書き出したデータ.zip」というファイルをカレントディレクトリに持ってきて(あるいは以下のZipファイル名としてフルパスで '/Users/自分の名前/Library/Mobile Documents/com~apple~CloudDocs/書き出したデータ.zip' を指定して),次のスクリプトを実行する。
読む方法は,まずzipを展開してから
import xml.etree.ElementTree as ET

tree = ET.parse("apple_health_export/export.xml")
としてもよいが,展開せずに済ませるには次のようにする:
#! /usr/bin/env python3

from zipfile import ZipFile
import xml.etree.ElementTree as ET

with ZipFile('書き出したデータ.zip') as zipdata:
    with zipdata.open('apple_health_export/export.xml') as f:
        tree = ET.parse(f)
root = tree.getroot()
for x in root.findall('Record'):
    if x.get('type') == 'HKQuantityTypeIdentifierHeartRate':
        y = x.find('MetadataEntry')
        print(x.get('startDate')[:19], x.get('value'), y.get('value'), sep=',')
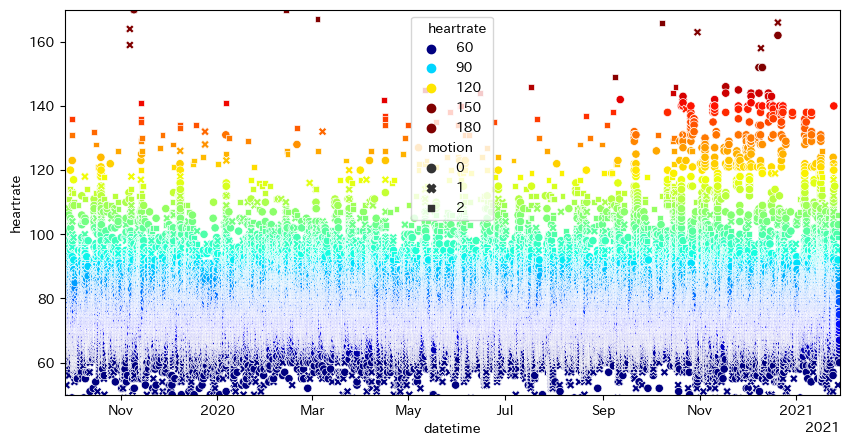
標準出力に日時・心拍数・そのときの運動状態(0,1,2)のCSVが出力されるので,適当にリダイレクトしてファイルに収める。あとはFitbitと同様にグラフを描けばよい。CSVからグラフを描く簡単なプログラムを挙げておく:
import matplotlib.pyplot as plt
import matplotlib.dates as mdates
import seaborn as sns
import pandas as pd

df = pd.read_csv('healthdata.csv', header=None,
                 names=['datetime', 'heartrate', 'motion'],
                 index_col='datetime', parse_dates=['datetime'])

locator = mdates.AutoDateLocator()
formatter = mdates.ConciseDateFormatter(locator)
pd.plotting.register_matplotlib_converters()
cm = plt.get_cmap('jet')

plt.figure(figsize=[10,5])
ax = sns.scatterplot(x=df.index, y=df['heartrate'], hue=df['heartrate'],
                     style=df['motion'], palette=cm, hue_norm=(60,150))
ax.xaxis.set_major_locator(locator)
ax.xaxis.set_major_formatter(formatter)
plt.xlim(min(df.index), max(df.index))
plt.ylim(50, 170)
(あれれ,2020年秋からちょっと高心拍数が増えているぞ?)[ 追記: に watchOS 7.0 が来ている。このバージョンから睡眠の判断ができるようになったなどの変化があり,それによって測定値が変化した可能性が Changes in Apple Health Export という記事で論じられている。]
もしプログラム上で日時を制限したいなら,例えば次のようにすればよい:
df = df[df.index >= pd.Timestamp("2021-01-01 00:00:00")]
ほかにも,例えば HKQuantityTypeIdentifierHeartRateVariabilitySDNN というタイプには心拍変動がミリ秒単位で入る。これらHKで始まる長い名前はHealthKit関連のものである。
上と同様にして睡眠開始時刻・終了時刻が取得できる:
for x in root.findall('Record'):
    if (x.get('type') == 'HKCategoryTypeIdentifierSleepAnalysis' and
        x.get('value') == 'HKCategoryValueSleepAnalysisAsleep'):
        print(x.get('startDate')[:19], x.get('endDate')[:19], sep=',')
こちらは夜間はApple Watchをつけていないことが多いので十分なデータが取れていない。